Install Python with VTK and Qt support for use with Eclipse in OS X Mountain Lion
August 20, 2012
In this post I’d like to show you how to install Python with support for VTK and Qt using Apple OS X 10.8 Mountain Lion. Then I set up Eclipse with the new Python installation in order to use all of it’s auto-completion and debugging capabilities. Please leave a comment with your experiences using this.
The instructions for the installation of Python and Qt consists mostly of information from these two posts [1] [2], so please credit these guys for this, not me.
If you run a Windows or Linux machine and you might want to do yourself a favor and use the DRE which is included in DeVIDE.
Install and configure Homebrew
As a very first step you need to install Homebrew, the friendly packet manager for Mac OS X [3]. This makes it really easy to install all the necessary stuff. While OS X already ships with versions of Python, Ruby and other stuff, the versions they provide are often deprecated and installing own packages can be quite frustrating. Homebrew installs all it’s stuff isolated from the system under /usr/local/cellar. This way you can install your own libraries without touching the components installed from Apple.
In order make sure that Terminal searches the bin folder of Homebrew first before the System bin folder (which is /usr/bin), you need to add it to the PATH-variable. This can be done by editing the .bash_profile file in you user root folder /Users/<your username>/.bash_profile (further referenced as ~/). If this file doesn’t exist, create it! Now you add
# ~/.bash_profile
export PATH=/usr/local/bin:$PATH
export PATH=/usr/local/share/python:$PATH
PIP.
Note: If you have a Terminal session up and running you need to restart it in order to apply the changes to the PATH. If you have trouble with hidden files on the system, this Tool can come in handy for you!
Before you install anything to Homebrew, be sure to run brew doctor and brew update to check if all dependencies are installed (xCode, Command Line Tools and x11). When brew doctor gives you green light you are good to go!
Install Python
The very first step is that you install your own version of Python by running the following command:
brew install python --framework --universal
Python installation of the system you need to execute
cd /System/Library/Frameworks/Python.framework/Versions
sudo rm Current
ln -s /usr/local/Cellar/python/2.7.2/Frameworks/Python.framework/Versions/Current
Python installation. You will be promted for you password since this is an action which requires admin rights.
If everything worked, which python should return /usr/local/bin/python.
Next step is the installation of PIP using the command
easy_install pip
which pip should return /usr/local/share/python/pip - otherwise the PATH is not properly set as described above.
Now you can install other Packages like Numpy or Scipy - depending on what you need. Note: If you want to install Scipy you need to install the gfortran compiler.
pip install numpy
brew install gfortran
pip install scipy
Scipy to make it work under Mountain Lion. This can be done using
pip install -e git+https://github.com/scipy/scipy#egg=scipy-dev
~/src and install Scipy from there.
Install Qt
To install Qt and Pyqt-bindings you execute
brew install qt
brew install pyqt
Install VTK
To install VTK you need to run
brew install vtk --tcl --qt --python --pyqt --examples
When this is done you should be able to import vtk into your Python environment without any errors.
Setup Python for use with Eclipse
This part is oriented on the introduction on how to include the DRE into Eclipse, which can be found under [4] and in the following screencast. I just made a few enhancements to make it work for this application. Note that the steps of the screencast don’t work exactly on our installation!
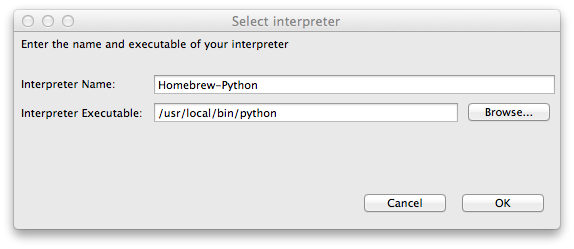
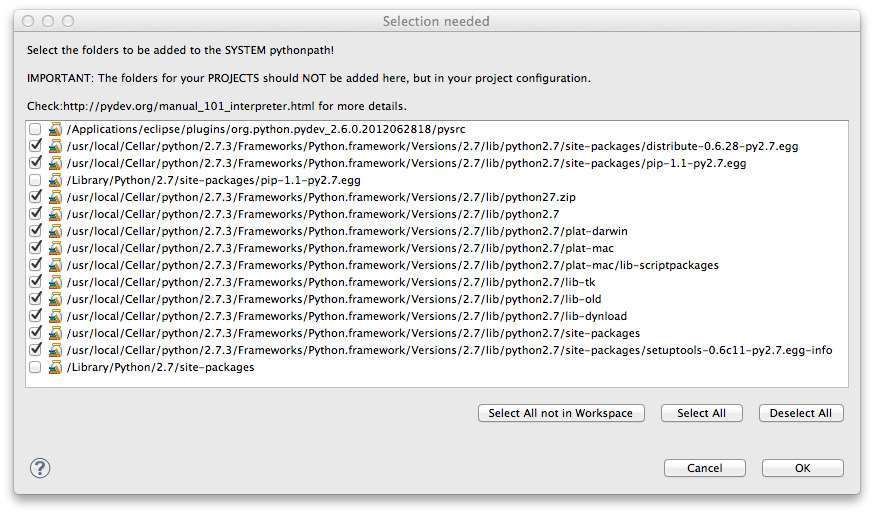
To use Python together with Eclipse you have to install the Classic Version from the official homepage. Next, install PyDev into Eclipse. Now you need to tell Eclipse which Python installation it should use. This can be done in Eclipse → Settings → Pydev → Interpreter-Python → New. In the next Dialog you have to add Path to the Homebrew Python.
Now you are good to go. Create a new PyDev Project, select the new created interpreter and play around with VTK - it all should be working with auto completion and the other neat Eclipse features. The Code example Charl used in the Screencast should compile:
# vtkDonutTest.py
import vtk
# create a donut polydata source
s = vtk.vtkSuperquadricSource()
s.ToroidalOn()
# connect it to a polydatamapper
m = vtk.vtkPolyDataMapper()
m.SetInput(s.GetOutput())
# and finally create an actor to represent the donut in the scene
a = vtk.vtkActor()
a.SetMapper(m)

# the renderer is the 3D scene
ren = vtk.vtkRenderer()
ren.AddActor(a)
# renderwindow to contain the 3D scene
rw = vtk.vtkRenderWindow()
rw.AddRenderer(ren)

# we want the user to interact
iren = vtk.vtkRenderWindowInteractor()
iren.SetRenderWindow(rw)

# get the whole business going
iren.Initialize()
rw.Render()
iren.Start()
To test the Qt-Support you can run the following code [5]:
# vtkQtTest.py
import vtk
from PyQt4 import QtGui
from vtk.qt4.QVTKRenderWindowInteractor import QVTKRenderWindowInteractor

"""A simple example that uses the QVTKRenderWindowInteractor class."""
# every QT app needs an app
app = QtGui.QApplication(['QVTKRenderWindowInteractor'])

# create the widget
widget = QVTKRenderWindowInteractor()
widget.Initialize()
widget.Start()
# if you dont want the 'q' key to exit comment this.
widget.AddObserver("ExitEvent", lambda o, e, a=app: a.quit())

ren = vtk.vtkRenderer()
widget.GetRenderWindow().AddRenderer(ren)

cone = vtk.vtkConeSource()
cone.SetResolution(8)

coneMapper = vtk.vtkPolyDataMapper()
coneMapper.SetInput(cone.GetOutput())

coneActor = vtk.vtkActor()
coneActor.SetMapper(coneMapper)

ren.AddActor(coneActor)

# show the widget
widget.show()
# start event processing
app.exec_()
Add VTK-Module to Qt-Designer
If you want to use the Qt-Designer for the use with VTK, things get a little bit tricky. The Qt-Designer comes with our installation of Qt under /usr/local/Cellar/qt/4.8.2/Designer.app and is a WYSISWYG-Editor for Qt-UIs. VTK already has installed a plugin for it, it just has to be sym-linked into the Qt-Designer-Path. You can do this using the following commands, but check your current versions before running these.
cd /usr/local/Cellar/qt/4.8.2/plugins/designer
ln -s /usr/local/Cellar/vtk/5.10.0/plugins/designer/libQVTKWidgetPlugin.dylib libQVTKWidgetPlugin.dylib
Qt-Designer. The tricky part begins now. Unfortunately when you try to include a Qt-UI which contains a QVTKWidget, it fails to compile, because QVTKWidget belongs to the Class QVTKWidget.QVTKWidget, while the correct class is vtk.QVTKWidget. You can fix this using the following workaround.
When you have created your UI using the Qt-Designer you can convert it to Python-Code using the command
pyuic4 myTestApp.ui > myTestApp_ui.py
from QVTKWidget import QVTKWidget
from vtk import QVTKWidget
Qt-Designer.
To give an example for a converted UI file which runs, look at the following code.
# pythonQtVTKTest.py
import sys
import vtk
from PyQt4 import QtGui
from pythonQtVTKTest_ui import Ui_Form_Main

class StartQT4(QtGui.QMainWindow):
    def __init__(self, parent=None):
        QtGui.QWidget.__init__(self, parent)
        self.ui = Ui_Form_Main()
        self.ui.setupUi(self)
        self.draw_stuff()
    def draw_stuff(self):
        # create a donut polydata source
        s = vtk.vtkSuperquadricSource()
        s.ToroidalOn()
        # connect it to a polydatamapper
        m = vtk.vtkPolyDataMapper()
        m.SetInput(s.GetOutput())
        # and finally create an actor to represent the donut in the scene
        a = vtk.vtkActor()
        a.SetMapper(m)

        # the renderer is the 3D scene
        ren = vtk.vtkRenderer()
        ren.AddActor(a)
        # renderwindow to contain the 3D scene
        rw = vtk.vtkRenderWindow()
        rw.AddRenderer(ren)
        self.ui.qvtkWidget.GetRenderWindow().AddRenderer(ren)

        # we want the user to interact
        iren = vtk.vtkRenderWindowInteractor()
        iren.SetRenderWindow(rw)

        # get the whole business going
        iren.Initialize()
        rw.Render()
        #iren.Start()

if __name__ == "__main__":
    app = QtGui.QApplication(sys.argv)
    myapp = StartQT4()
    myapp.show()
    sys.exit(app.exec_())
# pythonQtVTKTest_UI.py
# -*- coding: utf-8 -*-

# Form implementation generated from reading ui file 'pythonQtVTKTest.ui'
#
# Created: Tue Aug 21 15:40:57 2012
#      by: PyQt4 UI code generator 4.9.4
#
# WARNING! All changes made in this file will be lost!

from PyQt4 import QtCore, QtGui

try:
    _fromUtf8 = QtCore.QString.fromUtf8
except AttributeError:
    _fromUtf8 = lambda s: s

class Ui_Form_Main(object):
    def setupUi(self, Form_Main):
        Form_Main.setObjectName(_fromUtf8("Form_Main"))
        Form_Main.setEnabled(True)
        Form_Main.resize(623, 462)
        self.qvtkWidget = QVTKWidget(Form_Main)
        self.qvtkWidget.setGeometry(QtCore.QRect(10, 10, 601, 441))
        self.qvtkWidget.setObjectName(_fromUtf8("qvtkWidget"))

        self.retranslateUi(Form_Main)
        QtCore.QMetaObject.connectSlotsByName(Form_Main)

    def retranslateUi(self, Form_Main):
        Form_Main.setWindowTitle(QtGui.QApplication.translate("Form_Main", "VTK Test", None, QtGui.QApplication.UnicodeUTF8))

from vtk import QVTKWidget
Using MacTeX and Homebrew
Just a short footnote for those of you who use MacTeX. MacTeX stores it’s files under /usr/local/texlive next to the Homebrew stuff. They coexist peaceful next to each other, you just have to apply some diplomacy using the following command [6].
sudo chown -R $USER:staff /usr/local
brew doctor, he will tell you what to do.
Thats it
Thank you for reading, I hope these instructions help you in some way. Please feel free to leave a comment. Have a nice day!
References
[1] http://www.thisisthegreenroom.com/2011/installing-python-numpy-scipy-matplotlib-and-ipython-on-lion/
[2] http://jbowles.github.com/blog/2012/04/22/python/
[3] http://mxcl.github.com/homebrew/
[4] http://code.google.com/p/devide/wiki/EclipseDRE
[5] https://svn.enthought.com/svn/enthought/Mayavi/trunk/enthought/tvtk/pyface/ui/qt4/QVTKRenderWindowInteractor.py
[6] https://github.com/ThinkRuby/thinkruby/wiki/.